
Install linux on laptop
When we buy a new laptop for development our basic need is to install linux (ubuntu mostly). And intel has made it more difficult to install ubuntu by introducing RST (Rapid Storage Technology).
Due to this, we try to find a laptop that is Ubuntu compatible. I have met with a lot of developers who are looking for :
- best Linux laptop for developers
- dell XPS 13 developer edition
- best Linux os for laptop
- dell XPS 15 ubuntu
- ubuntu laptop 2020
- best Linux laptops 2022 etc.
But one thing we need to understand is, that it is not the laptop company that is affecting it. Most of the manufacturers are using Intel Chipset/CPUs and for performance enhancements of windows, they have introduced Rapid storage technology, which unfortunately is not supported by Ubuntu 18. So we need to disable RST first and then install the Ubuntu.
You can face various problems like:
- SSD not detected during Ubuntu installation
- Unsupported chipset error while connecting bootable USB drive
- ubuntu mmx64.efi not found
- Touchpad not working during installation etc.
Let’s start with installation:
- Download the latest version of Ubuntu 18 LTS (iso Image). https://releases.ubuntu.com/18.04/
- Download Rufus: https://rufus.ie/en/. Rufus is a very lightweight software to create a bootable USB drive.
- Now boot your system with the default windows OS. Now press the windows icon and search for RST (or rapid storage). Right-click on it and press uninstall.
- Now press Windows+R and search MSConfig.
- Go to the Boot menu and enable safe mode to Minimal.
- Now restart your laptop and press F2 to open bios settings.
- Go to the Main tab press ctrl+s and switch SATA mode from Rapid storage to AHCI
- Now we need to disable Secure Boot. The option will be either in the Boot menu or Security Menu.
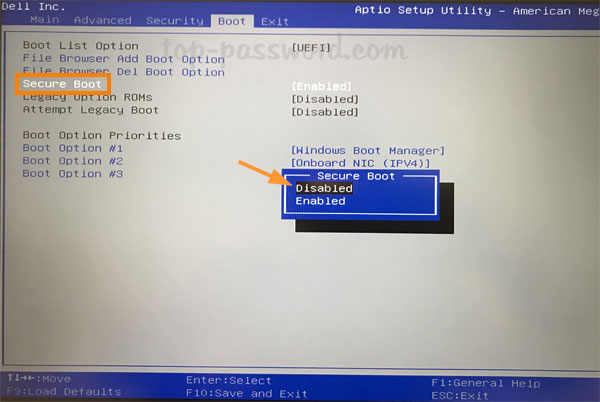
Sometimes it won’t allow you to change the mode or keys up/down arrows won’t go up to this option. (I encountered this in Acer Aspire 7, aspire 5 laptops). In that case, go to security and press enter. You are required to set a password (keep it simple that you can always remember).
Once the password is set then you’ll be able to go into the Boot menu and disable the Secure boot.
On some laptops, the F12 key is disabled for boot order. You can enable that from the Main menu.
Now press F10 and save your settings.
Restart the system and start the installation, this time you should be able to install ubuntu without any errors.
Please leave your comments if you face any other issues during the installation process.

Leave a Reply
We'll try to resolve your queries asap.
Recent Posts
22.Jan.2024 | codedrill | Drupal
Drupal 7 to 10 migration services
Hire Codedrill for Drupal 7 to Drupal 10 migration. We also offer complete drupal development services from
11.Jan.2024 | codedrill | Apache, Hosting, Linux, MySQL, PHP
Install php 8.2, mysql, apache, phpmyadmin on ubuntu 22
All the new CMS and frameworks have started support for php 8.2. And it is quite easy to install php8.2 on