Multi PHP using PHP-FPM Ubuntu
Problem Statement
When we manage our own cloud server/vps or even local machine, we come across situations where we need different PHP for different websites. There are different ways to do it and one of it is using PHP-FPM. multiphp, php7.4, php8.1.
Before following this guide, here are few questions which you should ask yourself:
- Are you a sysadmin/programmer who manges his own server and want to implement different php versions (7.4, 8.0, 8.1, 8.2 etc.) for different websites?
- Are you a developer who is upgradinng old Drupal 7 websites into Drupal 10 or Drupal 11 and having hard time to setup php7.4 and at the same time have PHP8.2 for latest Drupal?
What is Fast CGI?
FastCGI (Fast Common Gateway Interface) is a protocol for interfacing web servers with external applications.
What is FPM?
FPM stands for “FastCGI Process Manager,” and it is a specific implementation or variant of FastCGI. While FastCGI is a protocol for interfacing web servers with external applications, FPM is a specific implementation of the FastCGI protocol designed to manage and control FastCGI processes.
PHP-FPM is a specific implementation of FastCGI tailored for PHP applications. It works by running a set of PHP processes that can handle PHP requests sent by a web server.
Installing Different PHP Versions
First we’ll install different PHP versions on our machine. Then we’ll configure Apache to serve our php files uisng PHP version of our choice. For now I’ll show how to install php 8.2. You can follow same steps to install different versions.
Installing PHP8.2-fpm
Minimum OS requirement for this is Ubuntu 18.04 LTS / 19.10 / 20.04 LTS or Above
php/onrej has dropped support for fpm below ubuntu 18
1. Adding PHP Onrej PPA
PPA (Personal Package Archive) is software repository for distributing software and updates on Ubuntu-based Linux distributions. ondrej/php has been providing us with PHP packages since ages. In this step we’ll add ppa:ondrej/php source to our linux system. So that when we run install command using apt it searches into that PPA and installs the desired php version.
sudo apt-get install software-properties-common
sudo add-apt-repository -y ppa:ondrej/php
sudo apt update
2. Install php-fpm 8.2
sudo apt install php8.2-fpm
Verify Installation status:
sudo systemctl status php8.2-fpm
Enable the installed php version if it doens’t show active:
sudo systemctl start php8.2-fpm
sudo systemctl enable php8.2-fpm
Configure Apache to use different PHP Versions
Suppose you want to have two websites with different PHP versions.
- php82.local
- php74.local
Lets configure php82.local virtual host (If you are using actuall server you need to configure domain/subdomain/virtualhost there).
In /etc/apache2/sites-availabe create a file php82.local.conf and add following content:
<VirtualHost *:80>
    ServerName php82.local
    DocumentRoot /var/www/html/php82-fpm

    <FilesMatch \.php$>
        SetHandler "proxy:unix:/run/php/php8.2-fpm.sock|fcgi://localhost/"
    </FilesMatch>

    <Directory /var/www/html/php82-fpm>
        Options Indexes FollowSymLinks
        AllowOverride All
        Require all granted
    </Directory>

    ErrorLog ${APACHE_LOG_DIR}/php82.local_error.log
    CustomLog ${APACHE_LOG_DIR}/php82.local_access.log combined
</VirtualHost>
This is simple virtual host code with additional Sethandles which tells it to use php8.2-fpm.sock for this virtual host.
Enable proxy:
sudo a2enmod proxy
sudo a2enmod proxy_fcgi
sudo systemctl restart apache2
And then enable the newly created virtualhost:
a2ensite php82.local
sudo service apache2 restart
Create a directory in the specified location:
mkdir /var/www/html/php82-fpm
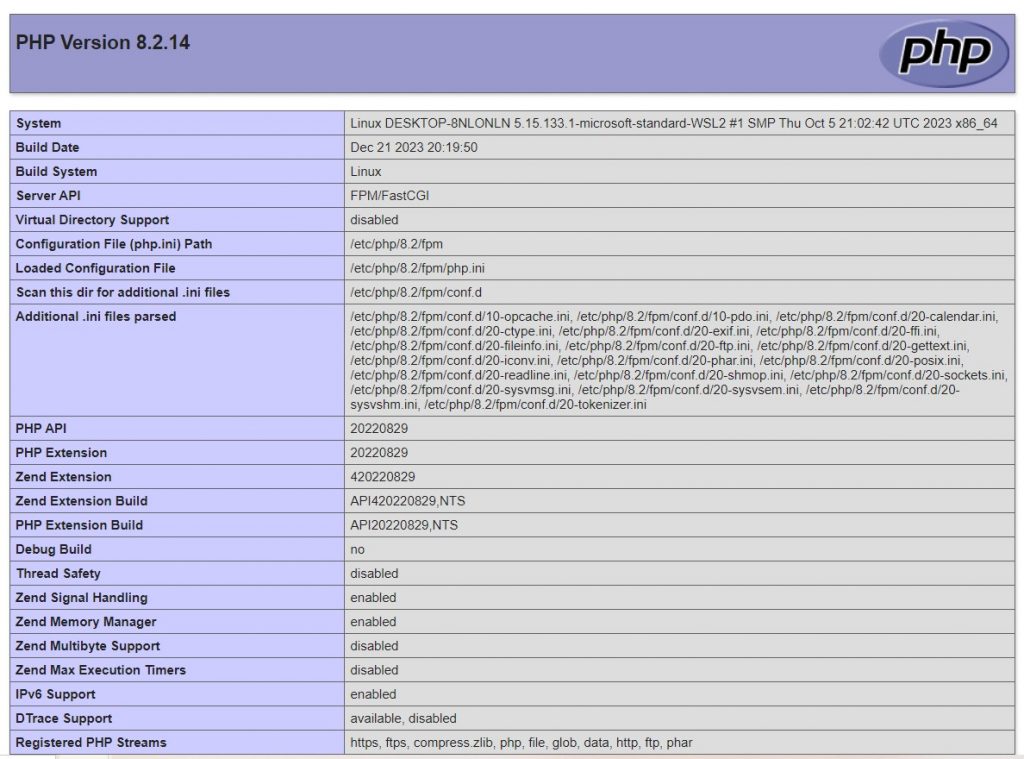
You can create an index.php file in this directory with phpinfo():
<?php
phpinfo();

You should see the desired version of PHP.
Now you can repeate the above process to install various php versions and create virtualhosts for each. So if you have to install php7.4 then your virtualhost will looks like this:
<VirtualHost *:80>
    ServerName php74.local
    DocumentRoot /var/www/html/php74-fpm

    <FilesMatch \.php$>
        SetHandler "proxy:unix:/run/php/php7.4-fpm.sock|fcgi://localhost/"
    </FilesMatch>

    <Directory /var/www/html/php74-fpm>
        Options Indexes FollowSymLinks
        AllowOverride All
        Require all granted
    </Directory>

    ErrorLog ${APACHE_LOG_DIR}/php74.local_error.log
    CustomLog ${APACHE_LOG_DIR}/php74.local_access.log combined
</VirtualHost>
Next enable the new subdomain:
a2ensite php74.local.conf


Leave a Reply
We'll try to resolve your queries asap.
Recent Posts
24.Mar.2025 | codedrill | Apache, Cpanel, Hosting, Wordpress
Fixing Gutenberg White Screen on GoDaddy
If you’re using WordPress with the Gutenberg editor on GoDaddy hosting and encountering a white screen or
7.Nov.2024 | codedrill | Uncategorized
Fun and Interactive Number Game for Kids: Learning ‘Before, After, and Between’ Numbers from 1 to 40
Looking for a fun, interactive way to help young children learn basic number concepts? This simple web-based